Install Cairo Dock – Linux Mint 16 or higher – cinnamon
Cairo-Dock is a Mac OS X Dock-like application for Linux and BSD distributions that supports OpenGL and freedesktop standards. It provides a desktop interface for launching applications and accessing running programs.
It offers a better interface than the bland panel of Linux Mint 15 for launching and accessing applications and as such may be used to replace it.
sudo -v
sudo add-apt-repository ppa:cairo-dock-team/ppa
sudo apt-get update
sudo apt-get install cairo-dock cairo-dock-plug-ins
Ok! I am adding below customization session because of the feedback i received.
The default theme of Cairo-Dock places the dock at the bottom edge of the desktop. So before launching it, it is best to flip the default Cinnamon panel to the top edge of the desktop. You can do this by using the Panel module from the System Settings and selecting the appropriate option from the Panel layout combo menu. This screen shot shows the Cinnamon panel settings options. Because Cairo-Dock provides the same functionality as the default panel, it is recommended to enable the Auto-hide panel option. After making these changes, apply them by restarting the Cinnamon desktop; right-click on the panel and select Troubleshoot > Restart cinnamon.

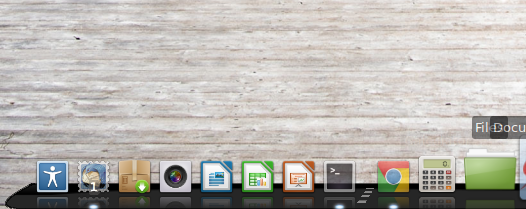
Cinnamon desktop showing Cairo-Dock. The default panel, which is now at the top edge of the desktop, is not visible in this screen shot because the Auto-hide panel option was enabled.

This screen shot shows one of the new features of Cairo-Dock 3.3; a search bar in the menu applet.

The best way to customize the dock is by using Advanced Mode of its configuration settings.

Cairo-Dock is fully themable, and you can really make your dock behave and look totally different from any other dock. This ability has a drawback : there are a *lot* of options. This little tutorial doesn’t have the ambition to describe all of the options (they are already described in the config panel with tooltips for most of them), but to guide you along the customization of your dock.
It also contains some useful tricks.
This tutorial is made for Cairo-Dock 2.2.0 or later. If your version is older, it is strongly recommended to upgrade, because the dock improves itself at each new version.
To get the latest version, use our repository, or grab the packages on LaunchPad, or install from the sources. This is fully explained on our wiki (http://wiki.glx-dock.org).
Be sure to install the plug-ins too.
The first time Cairo-Dock is launched, a default theme is applied. It is designed to be neutral and minimalistic. However, several themes are available directly in the dock: right-click -> Cairo-dock -> Configure, then go to the last tab called “Themes”.
Sort them by rating or sobriety according to your feelings, choose a theme, check the 2 little box at the bottom of the page, and apply. Quite easy.
Repeat the operation until you’ve found the theme that fits you the best.
Let’s start with the Coz’s “Clear” theme as a starting base, for instance.

Coz’s Clear Theme for Cairo-Dock
Before you start configuring the look, it may be wise to decide which launchers you want in your dock, and possibly how you will organize them in sub-docks.
To quickly remove an existing launcher, just drag and drop it out of the dock.
To quickly add a new launcher, just drag and drop it from the Applications menu into the dock, amongst existing launchers; an animated indicator will appear to show you when you can drop it.
Note :
To modify a launcher, right-click on it -> Modify this launcher. If you want to replace a launcher with another, the correct way is to delete the existing one and to create add a new one. Editing the existing one and changing its command is not recommended because launchers contain many other information.
A good habit is to save your current theme after you made some changes to it.
To save the current theme, open the Theme Manager as before, go to the “Save” page, choose a name for your theme, and apply.
If you want to delete some themes you don’t want anymore, go to the “Delete” page, tick the unwanted themes, and validate; that will delete them.
To open the configuration panel, <right-click> on Cairo-Dock, go to the Cairo-Dock sub-menu, and choose Configure.
By default, a simple config window is proposed. It is very straightforward and easy to use.
If you click the “advanced mode” button in the bottom, a much more complete config window will appear. We will describe it below.
Several categories are proposed in the left margin. The one that concerns us is the 2nd one (named “Appearance”).
But first, we’ll quickly go through the 1st category, that defines how your dock behaves.
Select the “Behavior” category; 4 modules are present :
- The first one, Position, can be used to modify where the dock is placed on your screen (and on which screen for people using multi-screen with Xinerama).
- The 2nd one, Visibility, defines how you access your docks : whether your dock auto-hides itself, stays below other windows or on the opposite reserve space for itself, whether sub-docks popup on click or on mouse-over, etc.
- The 3rd one, Taskbar, is quite interesting. Here you can toggle on/off the display of the current applications inside the dock. If you choose to activate it, several options are at your disposal, and allow the Taskbar to act either like MacOSX, Windows7, or a normal Gnome/KDE panel. One handy option is to close aplication on middle-click.
- The last one, System, regroups all the options that you will probably never want to tweak.
Now select the “Appearance” category; a lot of modules are present; they define the look of your dock.
- The Background module lets you customize everything about the background of the docks : frame, background image, etc.
- The Icons module is about the displaying of icons : icon theme, size, order, etc.
- The Labels module lets you customize the way text is rendered above and on icons.
- The Views module lets you change the way the dock and sub-docks are drawn : on a 3D plane, on a curve, on a parabole, etc.
- The Dialogs module defines the appearance of the bubbles Cairo-Dock uses to notify you.
- The Desklets module defines how applets are rendered when they are detached from the dock, and live on your desktop.
- The Indicators module lets you personalize all the indicators. These are graphics that are displayed to show something, like where you can drop something inside the dock, which is the current active window, which launchers are launched, etc
- The others are plug-ins that provide animations and special effects on your icons.
Enough talking, let’s go!
First we’ll setup the Background options.
- You can choose to display an image in the background, or to fill it with a gradation of 2 colours.
In the case of an image, you can choose to fill the background by repeating or by stretching it.
- To complete this, we can configure the outline of the dock : roundness of the corners, thickness and colour of the line, etc.

The previous Clear theme, with a different background colour.
Now, we will take care of the icons themselves.
- At this point, it is nice to decide of a global icon look. You can find a lot of icon themes at gnome-look.org or other such sites. The dock lets you choose whether to use an icon theme for your icons, or whether to use your owns icons (they are located in ~/.cairo-dock/current_theme/icons; when you load a theme from the Theme Manager, this is where the theme places its custom icons). If you want to choose an icon theme, untick the option that says to use the local icons, and choose one of the available icon theme in the list. If you just want to use the default icon theme of your system, just let it blank.
An easy way to quickly alter the global look of your icons is also to add a background to each of them. This is done easily by filling the corresponding field with the path of an image.
Now let’s take care of how the icons are rendered.
- First we have the famous zoom effect; what you probably want to set up is the maximum zoom of the icons : 1.2 will give a light effect, when 2.0 will give a strong effect.
- Then we have the reflection of the icons (for views that use it, like the 3D-plane or Curve views). If you want to reduce the height of your dock, a good way is to reduce the reflect height. Usually a medium value looks good.
- You can also set up the size of icons by category. Here again, you can reduce the size of your dock with small icons. 48×48 is a common value.
- Last, we can set up the order of icons by type, if you want for example to place applets on the left and applications on the right.
- A little bonus feature is to draw a string that links all the icons. Just set its width to 0 if you don’t want it.

Setting “Gartoon” as the icon theme changes all the icons at once, giving your dock a completely different feeling.
Note :
You can always change the icon for a single launcher, by right-click -> modify this launcher, and setting a complete path to an image. Same goes for applets.
Note 2 :
To change the icon for a running application, you first have to activate “Overwrite X icons with launchers” in the Taskbar module. Doing this will tell Cairo-Dock to ignore the somewhat crappy icons provided by X, and to search for a better icon. Now, let’s say we have Nautilus running, and its corresponding icon in the dock. There is 2 cases :
- There is a “Nautilus” launcher in the dock, then Cairo-Dock will just use the same icon for the application, and we’re done.
- There is no such launcher, then Cairo-Dock will search for an image named “nautilus.xxx”, where “xxx” can be “svg”, “png”, “xpm”, etc. There is a great chance that such an icon will be found in the icon theme we set up previously. If you want to use your own image, just place an image with this name in the local icons folder (~/.cairo-dock/current_theme/icons).
How to name the image ?
Each icon must have the same name as the *class* for the relevant application. The class of an application is most of the time equal to its name, but not always.
To find the class for an application, make sure it’s open, and then go to a terminal and type
This will bring up a little pointer, which you use to click on the relevant window. You’ll get something like this in the terminal :
To get Cairo-Dock to show the correct icon, your custom icons must be given the same name as the application class, so for example nautilus.svg or nautilus.png.
Each dock can be rendered differently from the others. Changing the rendering of a dock will make it appear in a totally different way.
In the “Views” module, you can set the default rendering for docks and sub-docks.
For each sub-dock, you can modify its view (<right click>-> “modify this launcher”, same goes for applets).

Switching to another view really changes the rendering of your dock. Here, the “Curve” view.
The “Labels” module lets you configure the labels and quick-infos (Quick-infos are some small texts displayed on the icons to give short information, like the number of files in the Dustbin).
You can set up the font, size, color (a gradation), etc.
To make the text more readable, you may want to draw a background behind them. You can choose the colour, transparency, and size of the text background.
The dock interacts with you through dialog bubbles, that can display some message, warning, information, or even ask you question or any value. In the Dialogs module, you can configure their look : color and style of the bubble, font and size of the text, “ok” and “cancel” buttons, etc.
Several styles are available; they change the shape of the bubbles. For instance the “comics” one will make the bubbles look like carton bubbles, whereas the “tooltip” one will give a more classic shape.
Each applet can be detached from the dock and placed on your desktop. This module lets you choose a default decoration for all desklets. Each desklet can also be configured with its own decoration.
You can choose one of the available theme, or define your own (it’s just a background and foreground image, with an horizontal and vertical adjustment).
To make a really personal and original theme, you should personalize the <b>indicators</b>.
Indicators are small extra drawings that indicates the state of icons/dock. There are indicators for the drag-and-drop, drag-over, active window, and launched launchers.
- The drag-and-drop indicator* is displayed when you drag something over the dock (like a launcher from the Main Menu). It can be some image oriented from top to bottom, like an arrow, some rain, a star-fall, etc
- The drag-over indicator is a little emblem displayed on the icon when you drag something over it. It is drawn at 1/3 of the icon’s size.
- The active window indicator is drawn on the icon of the currently active window. you can set an image or just a back/foreground colour. You should try to make it discrete since it is drawn at the same place and size as the icon.
- The launched launcher indicator shows you which indicators have been already launched, if you’re using the Task-bar option “mix applications and launchers”. It is displayed at the bottom of the icon, and you can adjust its position vertically. It can be a circle, a light, etc. Try to choose something that fits the icon theme and icons shape.
To finish, and if you’re running the OpenGL back-end, you can easily add some fun to your dock.
The “Animated icons” and “Icon effects” modules will let you define one or more animations/effects when an icon is clicked or hovered by the pointer.
If the effects seems “too much” for you, you can customize each of them, and also choose to draw them behind the icon, to reduce the impact.
The “Illusion” module will let you choose an animation when the icon appear and disappear.
You’re almost done! You can now decide which applet you need, and where you’ll place them (in the main dock to keep an eye on them easily, in a sub-dock or on the desktop if it’s not needed). You can set up an icon for each of them, or even choose a theme for some of them (Clock, Dustbin, PowerManager, etc).
To go further, you can also try to make your own gauge theme. A gauge is made of some images and an XML file that describes the gauge. See exemples in /usr/share/cairo-dock/gauges.
When you make a personnal theme for an applet (a gauge, a clock, a dustbin, etc), put everything all the files in a folder named with the name you want for your theme, and place this folder into ~/.config/cairo-dock/extras/gauge if it’s a gauge, or ~/.config/cairo-dock/extras/clock if it’s a clock, etc.
Cairo Dock Customisation